Hi, in this example we are going to show how to create a simple UI table (af:table) which is binded to Business Components.
Once again, I tried to search on the net with the simple criteria:
"How to create an af:table binded to business components ADF 11g"
And I must admit thatI did not get the answer I was looking for. The information was there, but hidden among other solutions and examples. This can be confusing some times.. So this is a small example of how to this. I hope it will clarify you some things.
Here we go.
Do not forget to always consult the official documentation:
http://docs.oracle.com/cd/E28389_01/web.1111/b31974/web_tables_forms.htm
First, I suppose you already have an 11g version installed on your machine along with some database connection already imported to your JDeveloper. In this example we are using JDeveloper 11.1.1.6.0
Start your Engines! JDeveloper, ok..
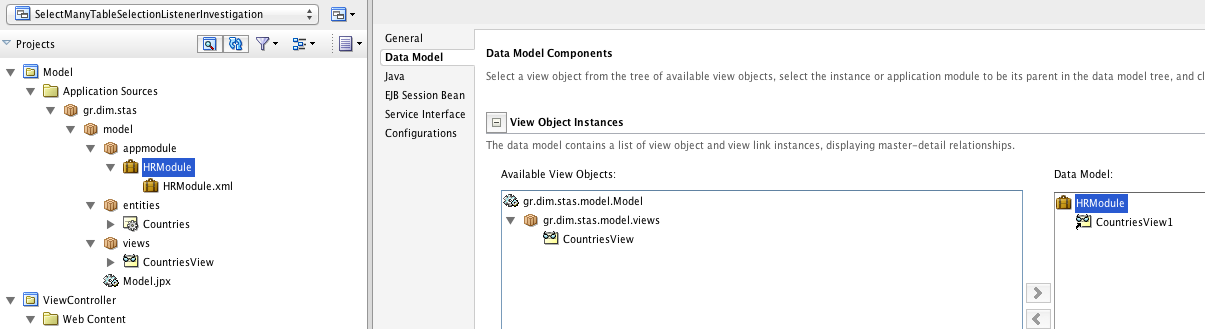
After creating the Business Components. You should have something like this on your JDeveloper:

In this example we are using the Countries table from the HR schema.
Next we are going to create a simple page.
1) Go to View Controller
2) Double Click the adfc-config.xml file to open it in the editor. We choose adfc-config in this example simply because we want to focus on the af:table. We could use Bounded Task Flows but it is no mandatory for this example.
3) We open the components section from the Components palette.
4) We select the View component and we drag and drop it to the adfc-config Diagram.

We havent created our jspx just yet. As you will see in the above screen, the name of the view component is changed to index. The default name was view1. I changed it just for convenience. You can rename it or leave it as is.
5) We double click the the index View component in order to create the page:
In this example we are going to accept the default values and we will just press ok:

After pressing ok:

6) Now it is time to create our af:table which is binded to BC.
But lets just wait a second.
What is an af:table?
According to the Documentation ( click to Enlarge ):

Well, this means that we have to provide a Data Collection to an af:table.
A Data Collection can be a tree binding in the pageDefinition of our jspx!
But wait.. how are we going to create this... what you say... tree binding.. and how are we going to map it to our table?? It is getting a bit complicated.. is not it?
Well, of course not! We will do it with one drag and drop!! Yes thats right! In ADF and JDeveloper, With one drag and drop we can do everything! We can create the table, and map it to our Business Components!
All we have to do is to locate the Data Controls section in our application navigator.

After locating this section, we are gong to find the HRModuleDataControl and then we will find the CountriesView1.
Long Story Short, this Data Control, one might say, that is the Data Control produced by the HRModule Application Module (Data Model).
So, every application module we create, we have it as a Data Control in the Data Controls section of the Application Navigator.
All we have to do is to select the Iterator (View object in the Application Module) and drag-and-drop it onto the jspx as a table.
7) select the CoutnriesView1 iterator. Have the jspx open in the editor. Drag and drop it as a table:

After selecting the ADF table option, another window will appear:
8) set the table options:

The above options, let you decide basic functionalities of the table with simple checkBoxes. Furthermore, they let you control which component you want to use for every attribute of the table. You can set the value of the Display label of every attribute. Furthermore you can add or remove attribute as you want. the most common option is the Row Selection, where you can decide wether you want to select none, one or many rows in your table.
All those options, and more can be configured after you actually create the table.
9) press ok in order to create the table AND the pageDefintion file and the DataBindings file (if the pageDef already exists for this page it will be created again. It will simply be updated. The same goes for the DataBindings as well.)

the pageDef. As you can see, a tree iterBindings was created by the wizard that points to the CoutnriesViews1 iterator which leads to HRModuleDataControl:

DataBindings.cpx file. This files holds the mappings between pageDefs and their pages or method calls and generally, whatever accepts pageDefs. It is the file where you can see those mappings.

And that is it! As you can see, it is pretty easy and rather fun! a simple drag and drop, some options and here we are! we have a live and kicking af:table ready !
Of course, you can always change the properties and experiment further with this component.
Regards.
Once again, I tried to search on the net with the simple criteria:
"How to create an af:table binded to business components ADF 11g"
And I must admit thatI did not get the answer I was looking for. The information was there, but hidden among other solutions and examples. This can be confusing some times.. So this is a small example of how to this. I hope it will clarify you some things.
Here we go.
Do not forget to always consult the official documentation:
http://docs.oracle.com/cd/E28389_01/web.1111/b31974/web_tables_forms.htm
First, I suppose you already have an 11g version installed on your machine along with some database connection already imported to your JDeveloper. In this example we are using JDeveloper 11.1.1.6.0
Start your Engines! JDeveloper, ok..
After creating the Business Components. You should have something like this on your JDeveloper:
In this example we are using the Countries table from the HR schema.
Next we are going to create a simple page.
1) Go to View Controller
2) Double Click the adfc-config.xml file to open it in the editor. We choose adfc-config in this example simply because we want to focus on the af:table. We could use Bounded Task Flows but it is no mandatory for this example.
3) We open the components section from the Components palette.
4) We select the View component and we drag and drop it to the adfc-config Diagram.

We havent created our jspx just yet. As you will see in the above screen, the name of the view component is changed to index. The default name was view1. I changed it just for convenience. You can rename it or leave it as is.
5) We double click the the index View component in order to create the page:
In this example we are going to accept the default values and we will just press ok:

After pressing ok:

6) Now it is time to create our af:table which is binded to BC.
But lets just wait a second.
What is an af:table?
According to the Documentation ( click to Enlarge ):
Well, this means that we have to provide a Data Collection to an af:table.
A Data Collection can be a tree binding in the pageDefinition of our jspx!
But wait.. how are we going to create this... what you say... tree binding.. and how are we going to map it to our table?? It is getting a bit complicated.. is not it?
Well, of course not! We will do it with one drag and drop!! Yes thats right! In ADF and JDeveloper, With one drag and drop we can do everything! We can create the table, and map it to our Business Components!
All we have to do is to locate the Data Controls section in our application navigator.

After locating this section, we are gong to find the HRModuleDataControl and then we will find the CountriesView1.
Long Story Short, this Data Control, one might say, that is the Data Control produced by the HRModule Application Module (Data Model).
So, every application module we create, we have it as a Data Control in the Data Controls section of the Application Navigator.
All we have to do is to select the Iterator (View object in the Application Module) and drag-and-drop it onto the jspx as a table.
7) select the CoutnriesView1 iterator. Have the jspx open in the editor. Drag and drop it as a table:

After selecting the ADF table option, another window will appear:
8) set the table options:

The above options, let you decide basic functionalities of the table with simple checkBoxes. Furthermore, they let you control which component you want to use for every attribute of the table. You can set the value of the Display label of every attribute. Furthermore you can add or remove attribute as you want. the most common option is the Row Selection, where you can decide wether you want to select none, one or many rows in your table.
All those options, and more can be configured after you actually create the table.
9) press ok in order to create the table AND the pageDefintion file and the DataBindings file (if the pageDef already exists for this page it will be created again. It will simply be updated. The same goes for the DataBindings as well.)

the pageDef. As you can see, a tree iterBindings was created by the wizard that points to the CoutnriesViews1 iterator which leads to HRModuleDataControl:

DataBindings.cpx file. This files holds the mappings between pageDefs and their pages or method calls and generally, whatever accepts pageDefs. It is the file where you can see those mappings.

And that is it! As you can see, it is pretty easy and rather fun! a simple drag and drop, some options and here we are! we have a live and kicking af:table ready !
Of course, you can always change the properties and experiment further with this component.
Regards.
No comments:
Post a Comment